Your name in lights! (Part 2)
Last time, we got to grips with the ‘Beast and its hardware and got comfortable transferring disk images onto the ‘Beast using Y-Modem.
We’re going to be building on that foundation here, so if you skipped Part One or are still a little shaky on the fundamentals you might want to go back and read it again.
To move forward, I’m going to assume that you’ve got SLIDE.COM on the B: drive of your ‘Beast, and that you have the corresponding PC utility installed somewhere in your PATH on your development PC. Refer to the SLIDE README if you need more help with that.
Set up
First things first: clone the Beast User repository on to your development PC.
We’re going to start in the scrolltext/basic/leds folder.
Background info
I already briefly mentioned the LEDs on the ‘Beast. To recap, there are 24 characters, and each character is made of 15 different LEDs that we can light individually, to make a symbol that we recognise as a letter, numeral, or punctuation.
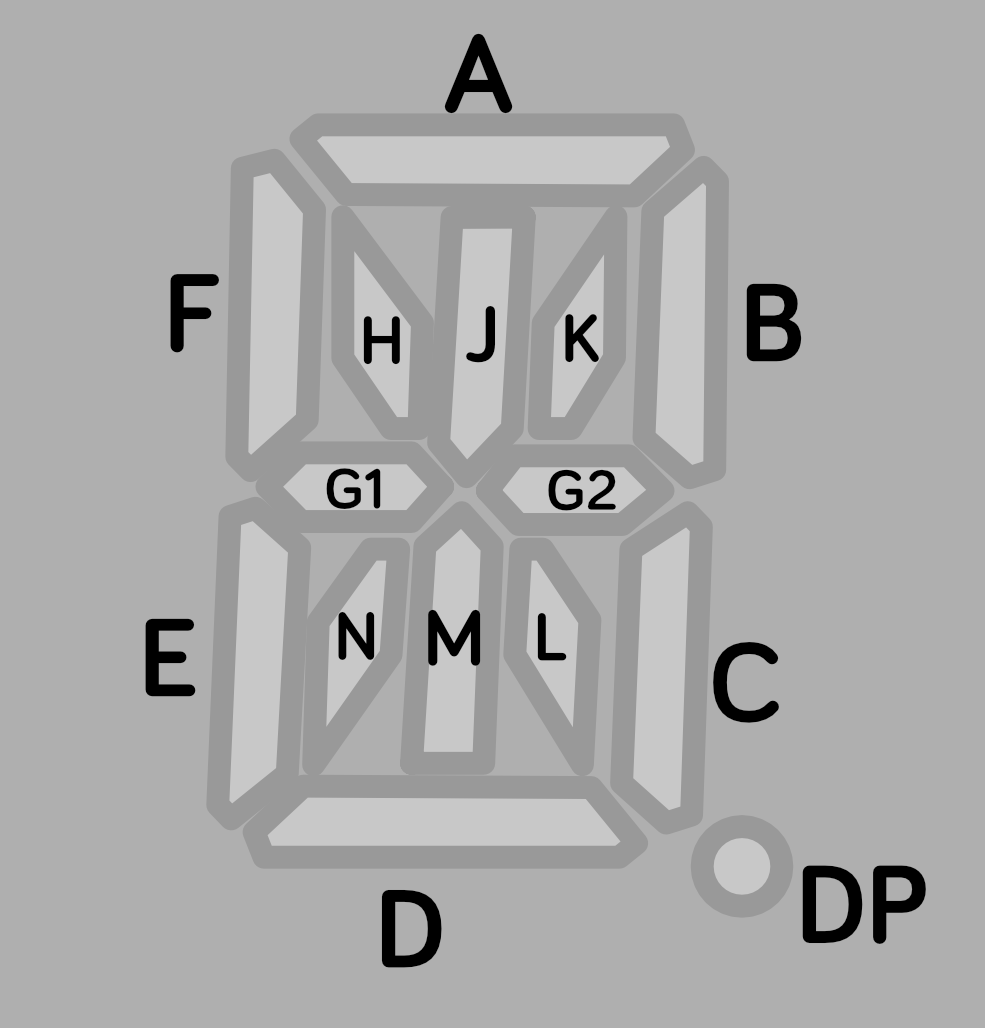
In other words there are 15 different LEDs that are either on or off for each of the 24 characters. So we can represent one character as a 16-bit word where each bit controls an LED, and we can represent the whole character array as a table or list of 24 16-bit words.
Here are the bit values that will activate each LED segment:
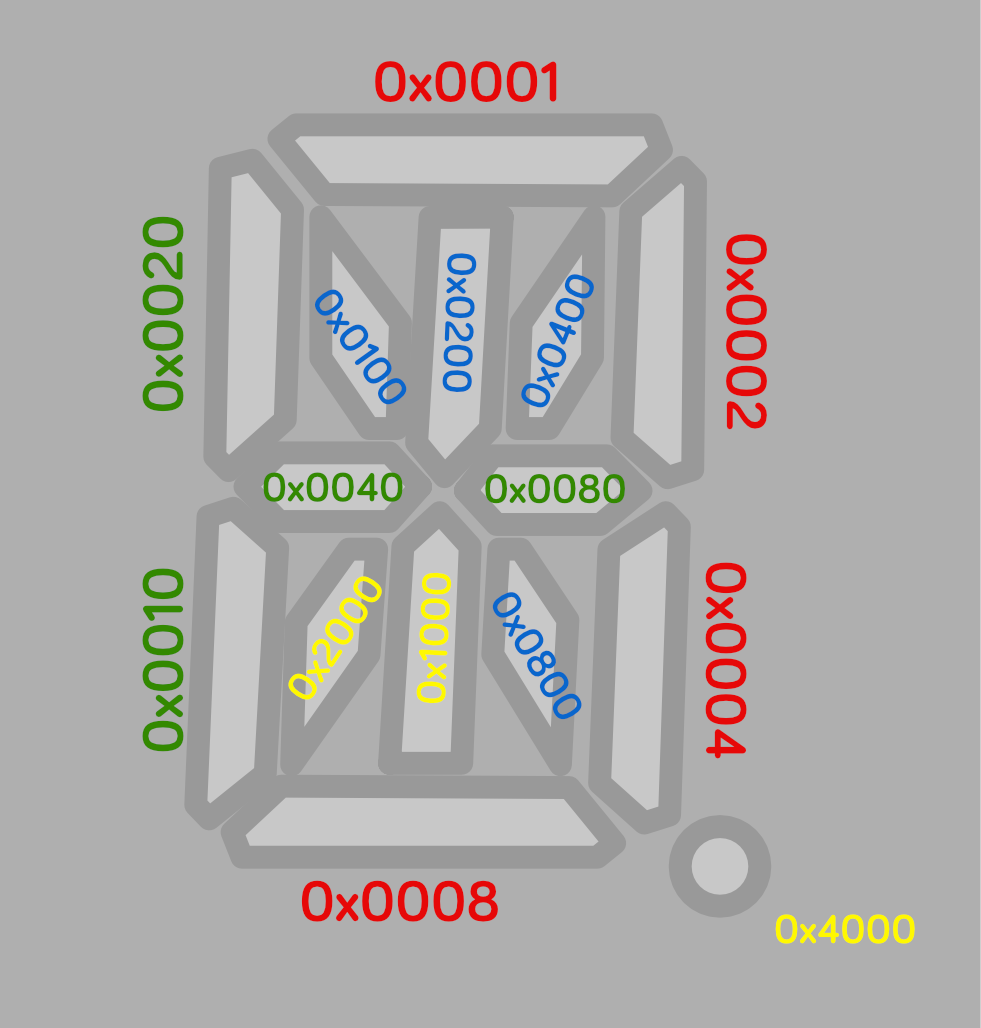
To light multiple segments, we combine their bits. This is technically an OR operation, but you can think of it as simply adding them altogether to come up with a number that represents the symbol we want.
You’re not limited to the standard boring ANSI fare: you can have any symbol that you can dream up, subject to the (rather restrictive!) geometry of the LEDs themselves.
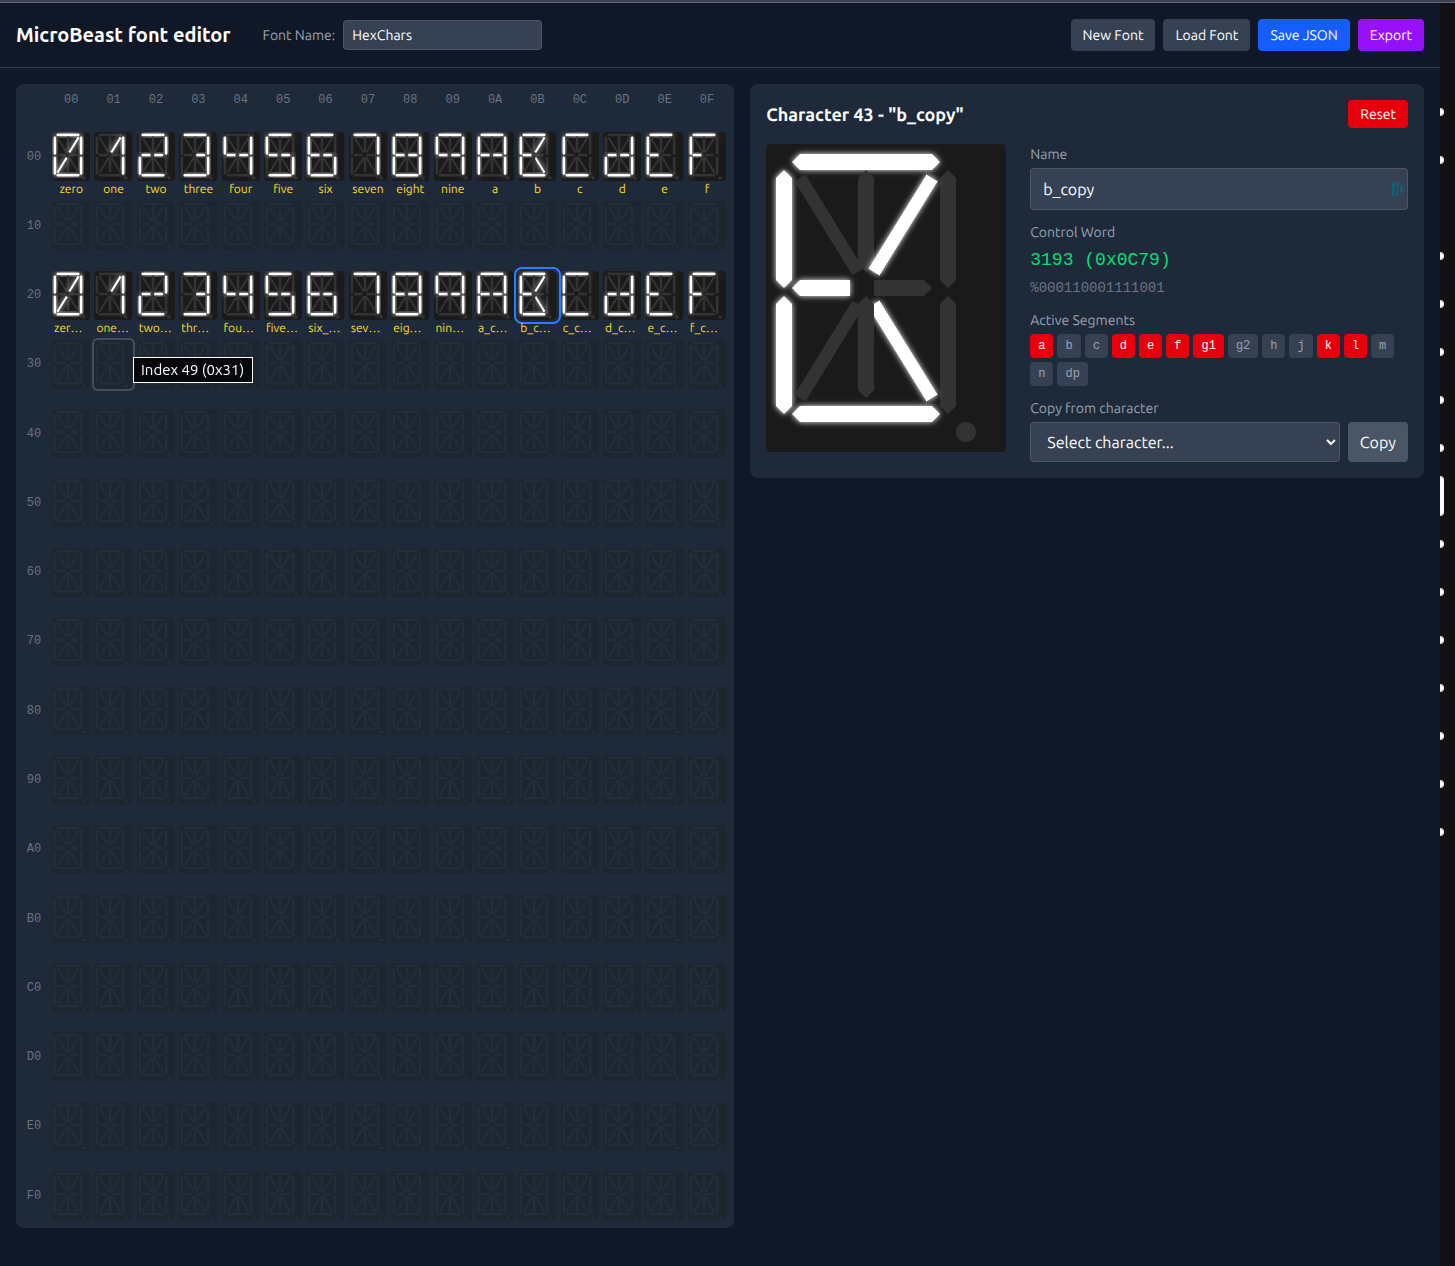
You can use my MicroBeast Font Editor to play with this ( instructions ) and see how symbols get turned into 16-bit words. If you come up with something that really tickles your fancy, make a note of its “control word” and use that in the examples that follow instead of the default value I’ll be giving you.
Once we know the value for our symbol, what do we do with it? How do we get it on the display? Luckily, the designers of your ‘Beast have got your back: they provide a BIOS call that takes a word describing the symbol and a column number as parameters, and does a lot of complicated hardware manipulation behind the scenes. We can treat it as a “black box”: we know precisely what it does, and we know what inputs (parameters) it needs to accomplish this, but we don’t care how it does it.

This is a machine code routine, so to pass parameters (the symbol we want and the column we want it in) we have to set up some z80 registers to contain those values. One of these is called HL - it contains the 16-bit word that describes the symbol - and the other is called A - it contains the column number, a value between 0 and 23 (because there are 24 columns on the LED display, and we start counting at 0).
Don’t worry about what registers are, and why some of them have single character names and some of them have two character names - we’ll get into that later. For now, just think of them as variables you can set, before calling the BIOS routine (think of it as a procedure or a function or even a GOSUB that does the work). So we’re essentially saying:
- set
HLto the 16-bit word that describes the symbol we want - set A to the column that we want to show it in
- make the processor jump to
MBB_WRITE_LED(0xFDD6) to do the work
This kind of encapsulation and re-use is fundamental to pretty much all forms of software development; often described as the DRY principal: Don’t Repeat Yourself. (The opposite, of course, is Write Everything Twice…)
Microsoft BASIC 80
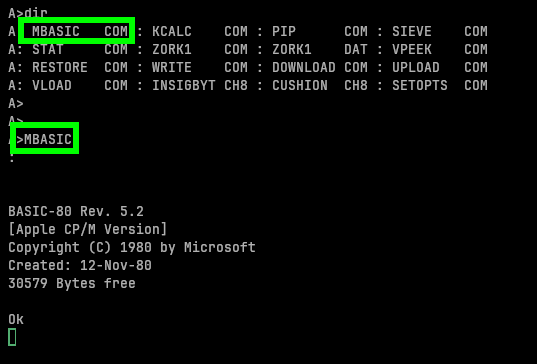
Your ‘Beast’s A: drive contains MBASIC.COM Which is Microsoft Basic 80 v5.2, from 1980. We can go ahead and type MBASIC to start it up:
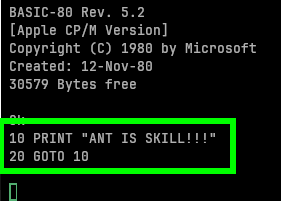
You can have a little play, if you like:
Type RUN to execute the program (and hit CTRL-C when you want it to stop):
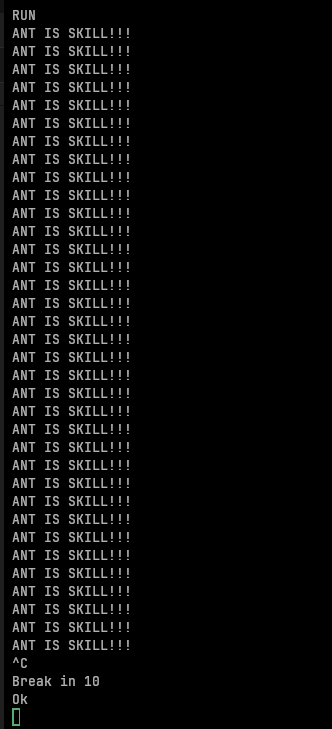
There was a period in the 1980s when every display in every computer shop in Bedford town centre looked exactly like this!
By the way, to get out of BASIC and get back to CP/M, type SYSTEM and hit ENTER.
Calling BIOS routines from BASIC
You might imagine that calling the BIOS routine we’re interested in is as simple as setting up our HL and A variables and using some sort of keyword that means “call some machine code at an address I specify”:
1
2
3
HL = 65535
A = 0
CALL 0xFDD6
and MBasic does indeed provide a CALL keyword that does exactly this, with a couple of caveats:
- The thing we want to call must be a variable name, not a numeric constant
- We can pass parameters! But which registers they’re allocated to is controlled by MBasic, we can’t specify what goes in
HLand what goes inAdirectly. - the parameters also must be variable names, not constants.
If you’re interested: if there’s only one parameter, its address is passed in
HL. If there are two parameters, their addresses are passed inHLandDE. If there are three parameters, their addresses are passed inHL,DE, andBC, and if there are more than three the address of the first one goes inHL, the address of the second one inDE, and the addresses of the remaining parameters are stored in a memory block in sequence, and the address of that block goes inBC! See the MBasic disassembly line 18114 for details. Obviously they don’t cover any of this in the MBasic Manual.
The usual approach, it seems, is to POKE in a small machine code wrapper that shuffles things around.
The code looks like this:
1
2
3
4
5
6
7
8
9
10
11
12
13
14
15
16
17
18
19
20
21
22
23
24
25
26
27
28
29
30
31

10 REM === MicroBeast LED Demo - Step 1: Raw Segment Control ===
20 REM Turn ON all 14 segments of the last 4 LED positions (columns 20-23)
30 REM
40 REM MBB_WRITE_LED (&HFDD6): HL = bitmask, A = column (0-23)
50 REM Bitmask &H3FFF = all 14 segments ON
60 REM
70 REM MBASIC cannot set CPU registers directly, so we POKE a small
80 REM machine-code stub into memory that loads HL and A then calls BIOS.
90 REM
100 REM --- Machine code stub at address 60000 (&HEA60) ---
110 REM CALL S%(BM%, C%) passes HL=&bitmask, DE=&column
120 REM The stub dereferences the pointers:
130 REM   EX DE,HL / LD A,(HL) / EX DE,HL  ; A = column
140 REM   LD E,(HL) / INC HL / LD D,(HL)   ; DE = bitmask
150 REM   EX DE,HL / CALL &HFDD6 / RET     ; HL = bitmask
160 REM
170 S% = &HEA60
180 FOR I% = 0 TO 10: READ V%: POKE S%+I%, V%: NEXT I%
210 REM
220 REM --- Write all segments ON to columns 20-23 ---
230 BM% = &H3FFF: REM all 14 segments ON
240 FOR C% = 20 TO 23
250   CALL S%(BM%, C%)
260 NEXT C%
360 REM
370 PRINT "All segments ON for columns 20-23"
380 END
390 REM
400 REM --- MBB_WRITE_LED stub (11 bytes) ---
410 DATA &HEB, &H7E, &HEB, &H5E, &H23, &H56, &HEB, &HCD, &HD6, &HFD, &HC9
Obviously this approach is a bit unfortunate when you’re trying to demonstrate BASIC before introducing machine code, but as far as I’m aware there is no other way to do it (short of replicating huge swathes of the BIOS code in BASIC). So for the time being, ignore lines 10-210 which create the machine code wrapper.
In line 230 we’re setting the bitmask variable:
1
BM% = &H3FFF
The % means “make BM an integer variable”, otherwise MBasic will assume it’s a floating point (real) number, and those don’t play well with machine code. The &H3FFF is MBasic syntax for “this is a hex constant”: the actual value is 3FFF or 0x3fff as I prefer to write it. Sometimes you’ll see this as &3FFF, $3FFF, #3FFF… every compiler / interpreter / assembler has its own ideas!
In lines 240 to 260 we’re looping over columns 20 to 23 (that’s the four right-most ones on the display) and writing our funky symbol to them. The CALL S%(BM%, C%) is the bit that calls the machine code. S% is where our machine code wrapper lives, BM% is the code word for the symbol, and C% is the column we want to write it to.
Let’s give it a go!
Running our first BASIC program
Fire up your ‘Beast and SLIDE LEDS.BAS over to your B: drive. Make sure you’re “logged in” to the A: drive (that’s CP/M jargon that means your prompt says A> - if it doesn’t type A: and hit ENTER). Type MBASIC to start the BASIC interpreter, and then type LOAD "B:LEDS" to load the demo program. You can type LIST to examine it if you like, and when you’re ready type RUN and hit ENTER:
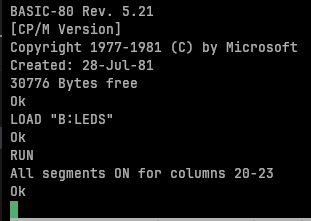
You should be rewarded with this splendid display:
Unfortunately, in MicroBeast firmware 1.7, there is a bug that prevents MBasic from running programs from the B: drive, which makes the above impossible! Hopefully by the time this blog is published a new firmware will have fixed the issue; if not I will provide a disk image that contains all the demo programs and a working MBasic: the only difference from the instructions given is that you’ll start in the
B:drive not theA:drive, and you canLOAD "LEDS"- theB:prefix is now not needed as we’re already “logged in” to drive B.
Things you can try
Try changing the code-word to display a different symbol. You can replace line 230 by typing e.g. 230 BM%=... and providing your new value. Type RUN to try it.
Try writing to all the columns, from column 0 on the left to column 23 on the right. Be aware that the console output might over-right the leftmost columns (that’s why I chose the rightmost ones for my demo!).
Try writing a different symbol to each column.
When you’re done, remember that SYSTEM exits MBasic and returns you to CP/M.
End of Part Two
So far so good - we learned a lot of stuff about MBasic and actually managed to write some code and run it on the ‘Beast! But funky symbols can only keep us amused for so long. Join me in Part Three where we can start to put recognisable characters on the display!